
Wireguard is a tool used to create a Virtual Private Network (VPN). It can be used to create a secure tunnel between any two devices on a network. These can be devices on a local network or wide area network. I’ve used OpenVPN for some time now and wanted to give Wireguard a shot since it is “extremely simple” and “considerably more performant than OpenVPN”.
I’ll start by providing some background of how I ended up using Wireguard in a VPS. You can also jump straight to the tutorial.
Way back when …
(ip addresses simulated)

(ip addresses simulated)

(ip addresses simulated)
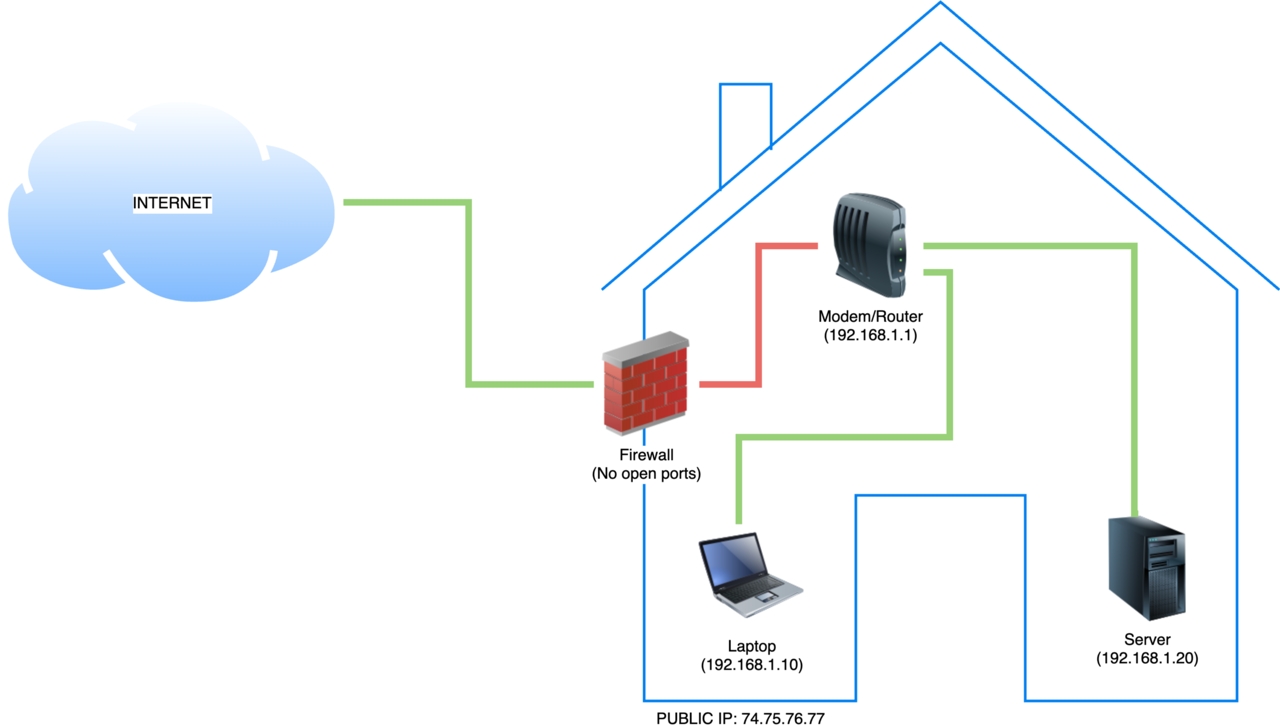
Before looking into how to install/configure Wireguard let’s take a look at how I arrived at my present day setup. The diagram above represents how my network started out. All devices were connected to a modem/router/wireless access point (either directly or via a switch). This was a simple setup as all I needed to do was connect new devices to this one router. Any device on the network could talk to any another device, and they were behind a firewall (configured in the modem/router) so no device on the internet (WAN) could poke at them.
I ran a server in my home network which was used to serve sites. I could access these sites as long as I was in my home network (connected via ethernet to the modem/router or wireless access point (WAP)). However I was out of luck when I wanted to access these sites outside my home network.
Access away from home
(ip addresses simulated)
(ip addresses simulated)
(ip addresses simulated)
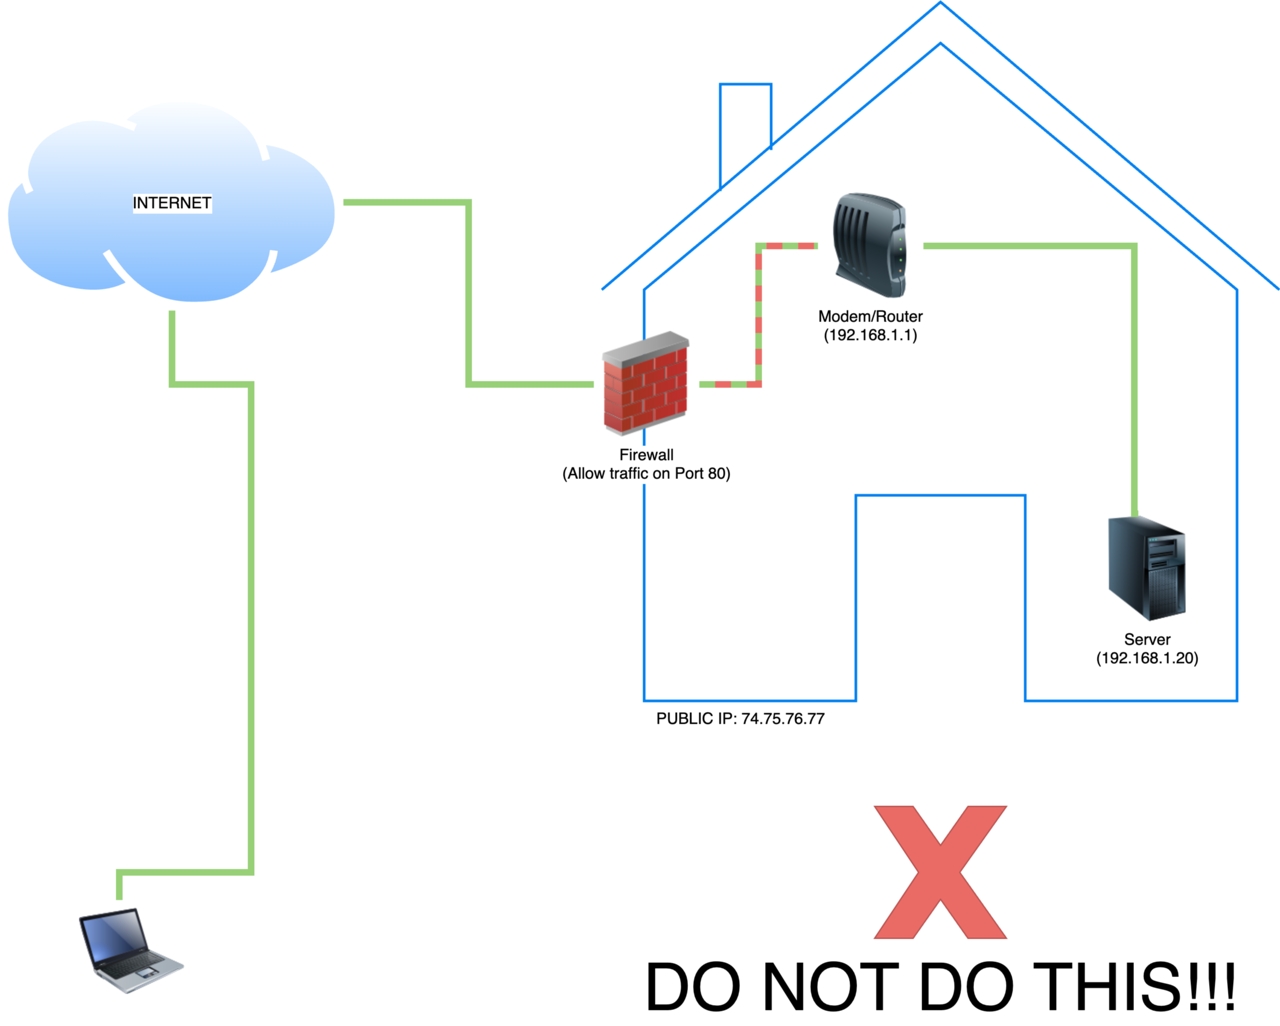
When I was away from home, I achieved connectivity to my internal home network by exposing port 80 in my firewall (yuck 🤮). This was how things were up until September 2018. This meant anyone could visit Campoutkid (this site) by Hypertext Transfer Protocol (HTTP). This was BAD! Any information sent between any client (browser) and the web server (site) would be unencrypted! Luckily none of my visitors ever needed to exchange any information (sensitive or not) with the web server. However, every time I logged into the site (when away of home) I would be doing so via an unencrypted connection. Very Unsafe!
To be clear, I was also faced with the risk of unencrypted login sessions when I was at home. But that’s a topic for another post.
👋 HTTPS
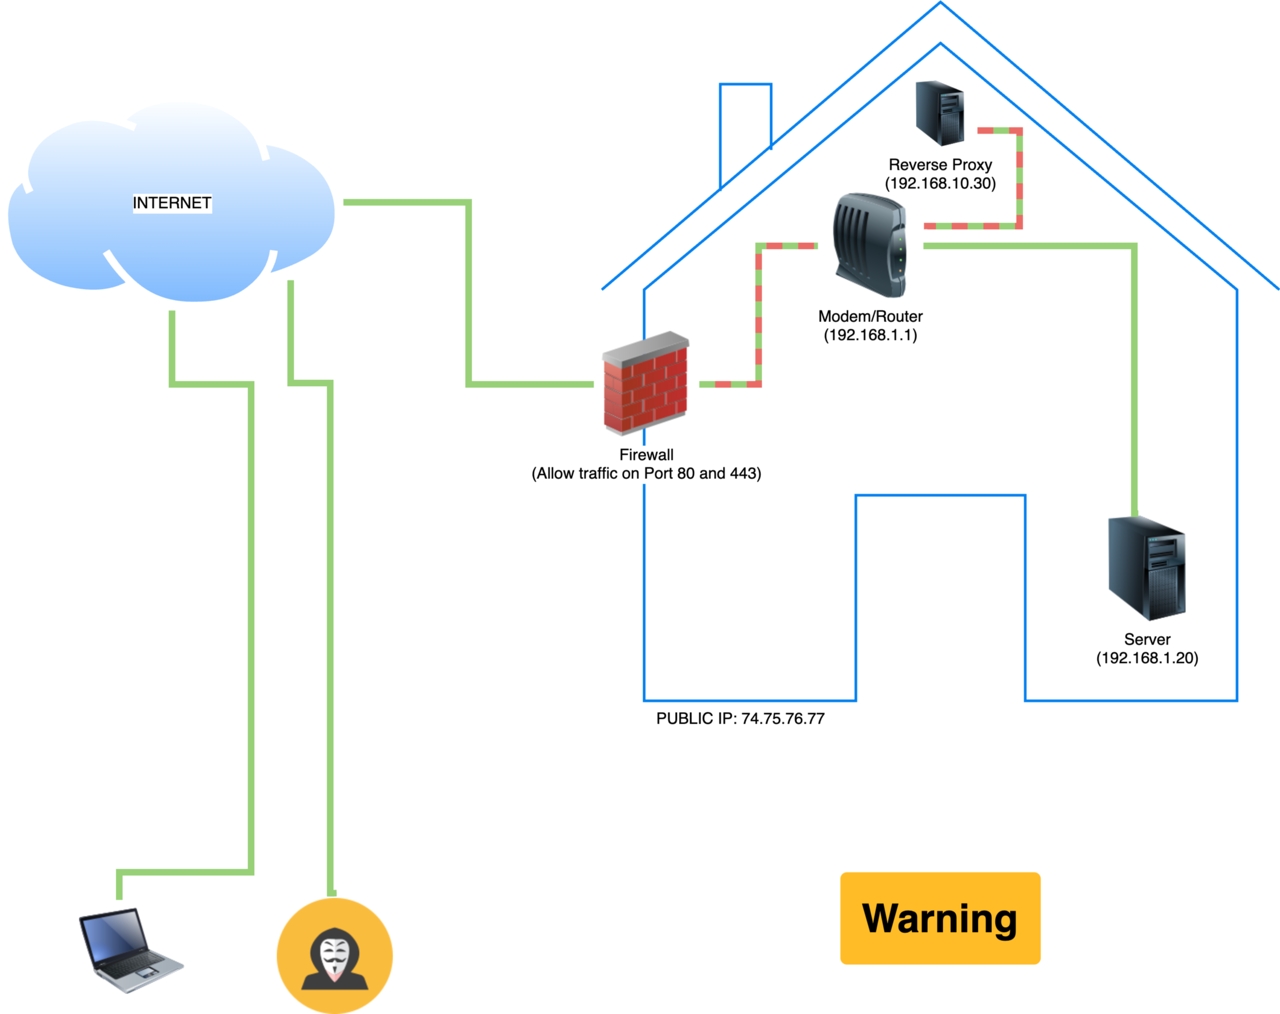
Welcome HTTPS! As part of learning Kubernetes I wanted to ensure all connections were made over HTTPS. I achieved this by running a reverse proxy inside my network. The reverse proxy integrated with Let’s Encrypt to serve clients with trusted certificates. The reverse proxy automatically redirected HTTP traffic to HTTPS and ensured that any data between any client and itself was encrypted.
This solved one problem (encryption), but left my home IP address (eg: 74.75.76.77) exposed (pictured below).
(ip addresses simulated)
(ip addresses simulated)
(ip addresses simulated)
This setup worked for many years, however it had some setbacks:
- A malicious individual would know my home’s public ip address (74.75.76.77)
- Since the upload speed of my ISP is slow (~11 Mbps) images would load very slowly
- The homepage took 20+ seconds to load
Wireguard 🤝 Virtual Private Server (VPS)
Using a VPS in combination with Wireguard (a VPN) I could overcome these setbacks. I no longer need to expose ports in my home network and I do not need to expose my home’s public IP address. I could also use the VPS to cache some content from the server as it’s upload speeds are much, much faster (~1 Gbps).
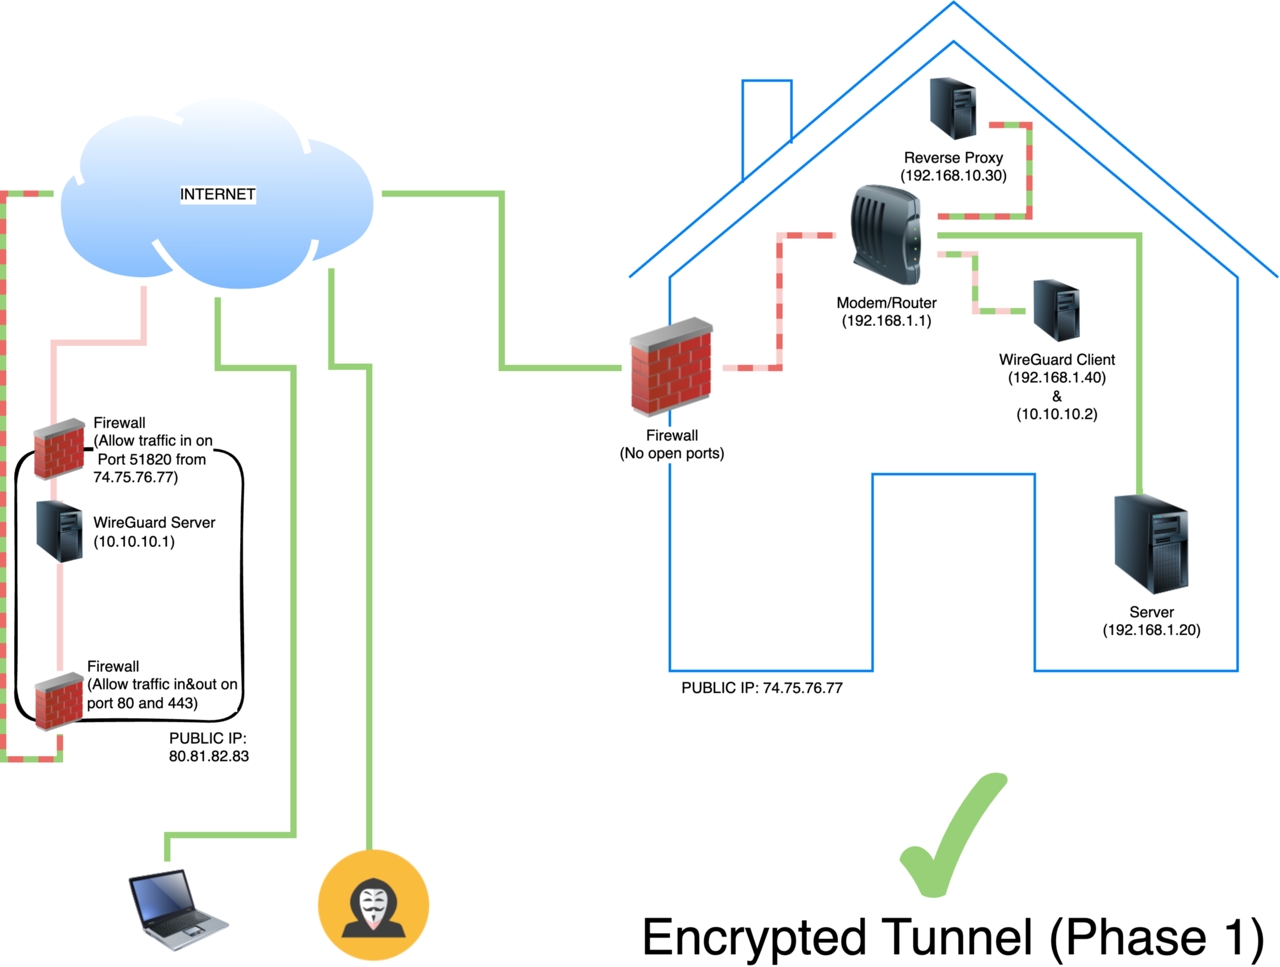
The first step (Phase 1) is to setup Wireguard server (peer) in a VPS while leaving the reverse proxy inside my home network to handle SSL termination. This requires setting up an additional peer (in my home network) to take the role of theWireguard client connecting itself to the Wireguard server.
(ip addresses simulated)
(ip addresses simulated)
(ip addresses simulated)
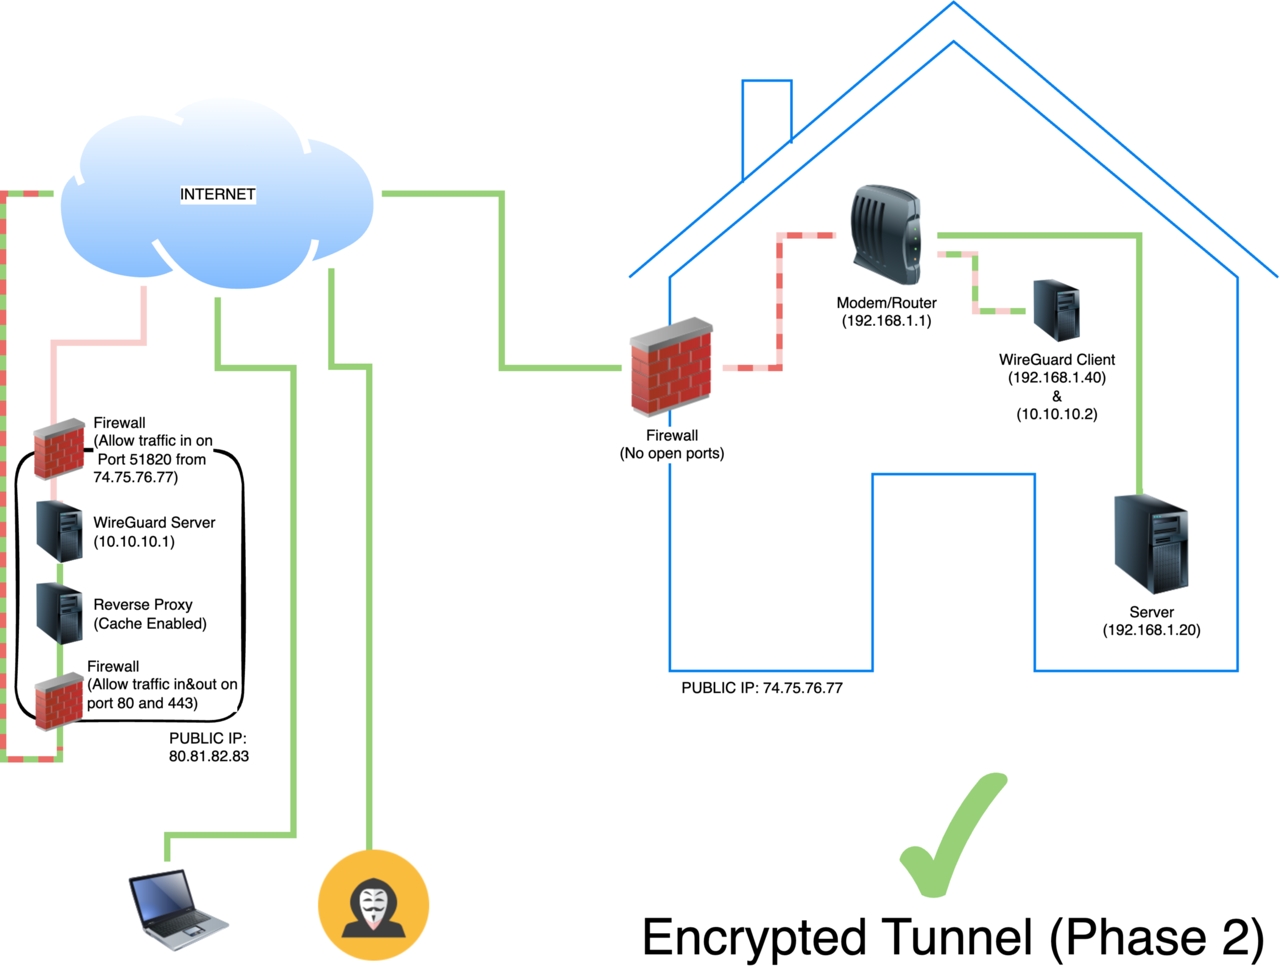
I’ve delayed discussing the meaning of the colored dashed lines in the diagrams above, and now is probably a good time to take a stab at it. Lets start in the home. The server [192.168.1.20] is connected directly to the router without restriction. The Reverse Proxy [192.168.1.30] and the Wireguard client peer [192.168.1.40] are also connected to the router. The Wireguard client is unrestricted within the home network [192.168.1.0/24] (this means it can talk to any other device on the 192.168.1.0/24 network) and has a VPN connection out to the Wireguard server peer running on the VPS using 10.10.10.2 as its peer IP address (explained in more detail below). The Reverse Proxy is listening on port 80 and 443 and therefore has a red/green connection to the modem/router (In the first diagram I used red to indicate that no inbound ports were exposed, and in the second diagram I used red/green to show that part of that connection was exposed). This leaves the connection between the modem/router and the firewall. It is colored pink/red to indicate that only the VPN connection can go through it. This means no ports need to be opened on the firewall at all (since the VPN connection is established outbound from within my home network)!
In the VPS (rounded box on the left) the firewall is configured to allow inbound VPN connections on port 51820 (default Wireguard port) from 74.75.76.77 (my public home IP address). This configuration probably is not necessary but adds additional security as it means any connections to that port (51820) will be blocked if they do not originate from my home’s public IP address. This means they wont even hit the Wireguard server at all.
The VPS’ firewall is also configured to allow connections on ports 80 (HTTP) and 443(HTTPS) in order to forward them to the reverse proxy. That line is represented with red/green for the reasons stated above.
With this setup anyone connecting to Campoutkid will need to go through the public IP of the VPS [80.81.82.83] in order to reach the server running in my home network. This is because the Wireguard tunnel forwards requests from one peer [10.10.10.1] to the other [10.10.10.2] which then forwards them to the revers proxy running inside my home network.
What about caching?
As I mentioned above, my ISP’s upload speed is slow. VPSs on the contrary typically have very fast upload speeds. So why not cache some of the content on the VPS (Phase 2)? We can achieve this by moving the reverse proxy into the VPS. This means some content will get served by the Reverse Proxy (if it is in the cache) while other content will be served by the Wireguard tunnel. This leaves the final diagram looking like this:
(ip addresses simulated)
(ip addresses simulated)
(ip addresses simulated)
⚠️ A word of caution
Even though a VPN provides an encrypted tunnel it does not mean I am not susceptible to malicious actors. If you really think about it there is still a direct line into my home’s network. Additionally, ports 80 and 443 are still open, just not directly on my home’s network. Therefore, it is important to protect the VPS server as much as possible, as if it were a part of your home network (with the tunnel it kindof is!).
Additionally, ensure to protect your home network. Segmenting your home network and employing proper firewall rules within your home network are all essential even with the presence of VPN or VPS.
The Tutorial
In this tutorial we’ll walk through how to create two Wireguard peers (similar to Phase 2 from above). One peer (the server) will be located on the VPS while the other peer (the client) will be located in our home network. We’ll configure the VPN in such a way that we will be able to reach all devices on our home network (within 192.168.178.0/24) from the Wireguard server.
But first, lets establish some assumptions:
- You already have 2 VMs which you’d like to establish a connection between readily available
- 1 Ubuntu 22.04 VM (outside home network). This will be our server.
- Private LAN IP: 192.168.159.3
- Public IP: 172.233.163.191
- 1 Ubuntu 22.04 VM (in your home network). This will be our client.
- Private LAN IP: 192.168.178.185
- Public IP: 66.175.219.66
- 1 Ubuntu 22.04 VM (outside home network). This will be our server.
- The 2 Wireguard peers will be communicating to each other on the 10.10.10.0/24 network.
- The server will have an address of 10.10.10.1
- The client will have an address of 10.10.10.2
- The important thing to note (displayed in the screenshot below) is that it is not possible to reach the client from the server using the client’s private IP address (or vice versa). At the end of this tutorial it will be possible for the wireguard-server to reach not only the wireguard-client but other LAN devices on the wireguard-client’s network.
- The below diagram demonstrates our starting point where each Wireguard peer can ping its own LAN ip address (first underlined comment in each terminal window) but cannot ping the other peer (second underlined command in each terminal window).

Start off by updating both Ubuntu 22.04 peers. On each of the two hosts execute the following commands:
sudo apt-get update
sudo apt-get upgrade
sudo apt-get install -y wireguard
Configuring Wirguard on the Server
After the above commands execute you can confirm you have Wireguard installed on the server by running the wg command (you should see a similar output printed on the wireguard-client):
root@wireguard-server:~# wg -v
wireguard-tools v1.0.20210914 - https://git.zx2c4.com/wireguard-tools/
We’ll start by configuring the server. Lets execute the following commands:
root@wireguard-server:~# cd /etc/wireguard
root@wireguard-server:/etc/wireguard# umask 077
root@wireguard-server:/etc/wireguard# wg genkey > private
root@wireguard-server:/etc/wireguard# wg pubkey < private > public
root@wireguard-server:/etc/wireguard# touch wg0.conf
We will now have 3 files in /etc/wireguard: private, public, and wg0.conf. Let’s update wg0.conf as follows (Be sure to replace the PrivateKey with the contents of your respective private file):
[Interface]
Address = 10.10.10.1/32
ListenPort = 51820
PrivateKey = aPcl2ESS7e5OXJpylWhG785OvrZuLd+cbnQHunwV12E=
That’s it! You’re server is ready to go. To start it just run:
root@wireguard-server:/etc/wireguard# wg-quick up wg0
root@wireguard-server:/etc/wireguard# sudo systemctl enable wg-quick@wg0.service
This will start the peer using the configuration in wg0.conf and enable Wireguard to restart when the server reboots. If all went well you should see something like:
root@wireguard-server:/etc/wireguard# wg
interface: wg0
  public key: SSWk4WY5wL09qEw2YOXG2kU43gaUewaF5HpXLdKI3Rc=
  private key: (hidden)
  listening port: 51820
Configuring Wireguard on the Client
Execute the following on the client:
root@wireguard-client:~# cd /etc/wireguard
root@wireguard-client:/etc/wireguard# umask 077
root@wireguard-client:/etc/wireguard# wg genkey > private
root@wireguard-client:/etc/wireguard# wg pubkey < private > public
root@wireguard-client:/etc/wireguard# touch wg0.conf
Then edit the wg0.conf file as follows:
[Interface]
PrivateKey = uNUHzyawGNCoqsbcW06Nw2C+DU2XEoympdXst0SILHM=
Address = 10.10.10.2/32

# setup packet forwarding
PreUp = sysctl -w net.ipv4.ip_forward=1

# setup iptables
PostUp = iptables -A FORWARD -i wg0 -j ACCEPT; iptables -t nat -A POSTROUTING -o eth0 -j MASQUERADE
PostDown = iptables -D FORWARD -i wg0 -j ACCEPT; iptables -t nat -D POSTROUTING -o eth0 -j MASQUERADE

[Peer]
PublicKey = SSWk4WY5wL09qEw2YOXG2kU43gaUewaF5HpXLdKI3Rc=
Endpoint = 172.233.163.0:51820
AllowedIPs = 10.10.10.0/24
PersistentKeepalive = 25
A couple of things to point out (from top to bottom):
- Replace the PrivateKey with the contents of the private file in /etc/wireguard/private on your client
- We are specifying that this peer will have the address of 10.10.10.2.
- We are specifying a command to run before the Wireguard interface comes up (PreUp). In this case we are forwarding ipv4 addresses through the tunnel. This allows us to access devices on the client’s network from the server. Note that you can also forward ipv6 addresses if you’d like. Pi-Hole has some good docs on this.
- Enabling NAT translation on the client.
- Replace the PublicKey with the public key from the server. In my case the public key on my server was SSWk4WY5wL09qEw2YOXG2kU43gaUewaF5HpXLdKI3Rc=. This should be equivalent to the PublicKey printed when running wg on the server
- The Endpoint specifies what the IP address and port of the Wireguard server
- AllowedIPs specifies which addresses are sent over the Wireguard tunnel. There are some good docs on this here.
- PersistentKeepalive configures how frequently a ping is sent (useful to keep the tunnel alive if no data is being sent on it).
That’s it! Let’s start the client:
root@wireguard-client:/etc/wireguard# wg-quick up wg0
root@wireguard-client:/etc/wireguard# sudo systemctl enable wg-quick@wg0.service
root@wireguard-client:/etc/wireguard# wg
interface: wg0
  public key: S9xAwFfFR3bcOKTK4/o3//l5c/VMQF6TH1OqL9LaBR4=
  private key: (hidden)
  listening port: 52195

peer: SSWk4WY5wL09qEw2YOXG2kU43gaUewaF5HpXLdKI3Rc=
  endpoint: 172.233.163.191:51820
  allowed ips: 10.10.10.0/24
  transfer: 0 B received, 16.19 KiB sent
  persistent keepalive: every 25 seconds
We see a very similar output to that of the server with a few exceptions:
- Even though we didn’t specify a listening port we were provided with one.
- Surprise, surprise! There’s no such thing as a server or a client in Wireguard. Every device is a peer. So Wireguard automatically picked a port for us here. However, a tunnel can be created by joining one peer to the other (i.e. Only one peer needs to be listening. We’ll leave that to the wireguard-server – 172.233.163.191)
- We have a peer listed
- Our Wireguard server is listed as the only peer.
- We are transferring data out but not receiving any data from the peer (we’ll fix that shortly)
You may be wondering why we’ve sent 16.19 KiB and received 0 B. The answer is because we haven’t configured the server to accept connections from the client. Yes, the server can receive connection as it is listening on port 51820, but it currently has no way of encrypting the information it’s sending to the client. To fix this we’ll update the wg0.conf file on the server and adding the following highlighted section:
[Interface]
Address = 10.10.10.1/32
ListenPort = 51820
PrivateKey = aPcl2ESS7e5OXJpylWhG785OvrZuLd+cbnQHunwV12E=

[Peer]
PublicKey = S9xAwFfFR3bcOKTK4/o3//l5c/VMQF6TH1OqL9LaBR4=
AllowedIPs = 10.10.10.0/24, 192.168.178.0/24
The above adds the PublicKey of the client and specifies we will accept ips from this peer from the 10.10.10.0/24 network and 192.168.178.0/24 network (remember that the client has an ip address of 10.10.10.2 (on its Wireguard interface) and 192.168.178.185 on the eth0 interface). Now restart the wireguard server:
root@wireguard-server:/etc/wireguard# wg-quick down wg0;wg-quick up wg0
and then the client:
root@wireguard-client:/etc/wireguard# wg-quick down wg0;wg-quick up wg0
Lets verify our progress! We can now see some Kilobytes were received by the server:
root@wireguard-client:/etc/wireguard# wg
interface: wg0
  public key: S9xAwFfFR3bcOKTK4/o3//l5c/VMQF6TH1OqL9LaBR4=
  private key: (hidden)
  listening port: 47918

peer: SSWk4WY5wL09qEw2YOXG2kU43gaUewaF5HpXLdKI3Rc=
  endpoint: 172.233.163.191:51820
  allowed ips: 10.10.10.0/24
  latest handshake: 1 minute, 3 seconds ago
  transfer: 7.53 KiB received, 16.55 KiB sent
  persistent keepalive: every 25 seconds
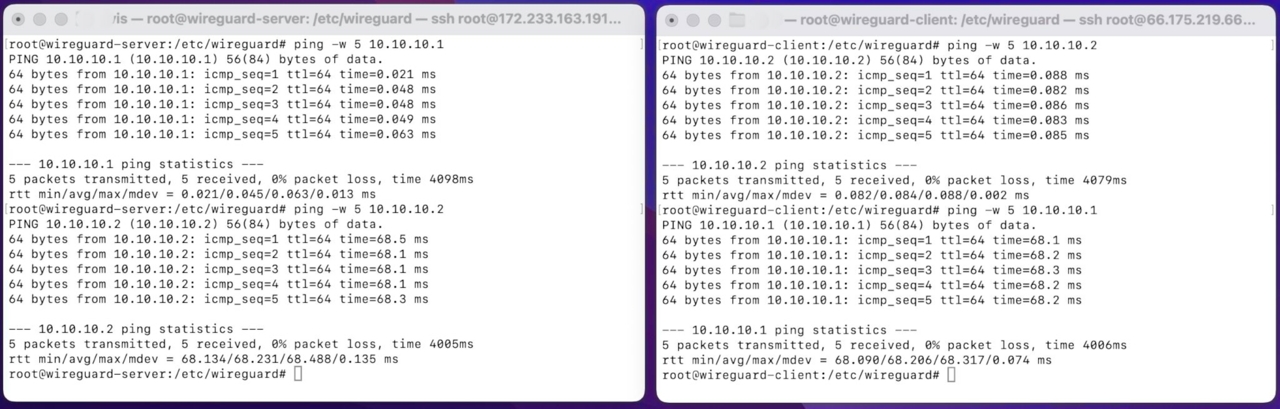
In the tunnel, the server can now ping itself (10.10.10.1) and also the client (10.10.10.2). Similarly, the client can ping itself (10.10.10.2) and also the server (10.10.10.1) as shown below:
Additionally, the server can ping the client on its local address (192.168.178.185), but the client cannot ping the server (192.168.159.3). This is because we only specified 10.10.10.0/24 as the allowed ips (on the client).
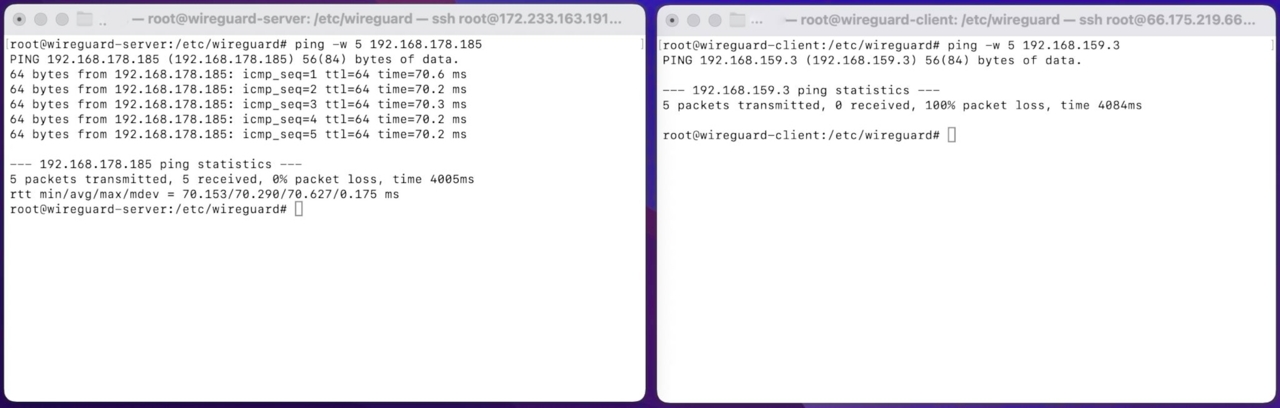
Most importantly the wireguard server can also reach other devices (192.168.178.186) in the client’s home network (not just the the wireguard client 192.168.178.185).

This means the server can tunnel traffic to other hosts in the home network through the Wireguard Tunnel.
Setting up caching on the Wireguard Server
We can now install a reverse proxy on the Wireguard server to forward requests through the tunnel to our backend web server (192.168.178.186). Any HTTP/HTTPS request will first hit our reverse proxy on the wireguard server (172.233.163.191) and then go through the encrypted Wireguard tunnel to a web server sitting within our home network. This process essentially masks our home’s public ip address (66.175.219.66).
The secondary benefit is that we can setup the reverse proxy to cache some larger content (images, audio, video). There are several guides out there for configuring a reverse proxy to cache content. Here are a few documents explaining how to implement caching using popular reverse proxies:
- HAProxy config tutorials / Network Performace / Caching
- Squid Web Cache documentation
- NGINX Content Caching
🥳 👏 🎉
Congratulations! You’ve made it to the end of my admittedly long article! I hope this has helped clear some aspects of Wireguard for you by providing you with a practical real world use case.